How To book Passport Appointment Online

After successful application of online passport , your next step would be to manage an appointment to visit local PSK for submitting the application. But this is not as simple as it looks like. Although this facility is available only  online, but the time given for slot booking is very less and at the same time every body  tries to book appointment thats-why it is not sure that anybody can get an appointment in first attempt only. There are few tricks to manage an appointment but those are also not guaranteed . Let's discuss about this and find out how to increase your chances to get your appointment.

First of all, visit passportindia.gov.in website and login with your email id. Then from the first screen click on "View Saved/Submitted Applications".
How to get passport appointment online

Now in the next screen you can see your submitted forms details.
get the appointment booking


For security reason, I have scratched the personal details. Here you can see your application details. Next click on the "Manage Appointment" option.
On next page Choose your PSK Location from drop down menu, and fill the CAPTCHA, Now from here click on "Create Appointment" button in the right side.
Manage Passport Appointment
 Then click on "Show Available Slots". 
The next page would appear as below. click fast any time slot. fill CAPTCHA again and hit ENTER. 

How To book Passport Appointment Online

at next page you'll see an overview of your appointment. at this page fill the CAPTCHA as fast as you can & press Enter.

passport appointment booking
 
If you are lucky then you'll see the last page as below.

passport appointment booking
there are some facts to be noted that many people try at the same time, so the database responds to them only who has a high speed or 3G internet. For a general internet speed you might reach to that screen, but by the time you click and book a slot, some will finish the booking itself. So practically there is no such trick to get an appointment. But we have couple of choices or alternatives to get an appointment. Let's check them and try to find out whether they are useful or not.

  • First thing you can do is to take high speed internet connection. If you don't have that or you cannot replace your existing one then find out among your friends. It will be a just 5 min task.
  • Always keep trying to log in before 5 min of actual time. Keep trying, although you will get the massage. Because everyone will do the same.
  • If you are able to manage a slot, then in the next screen you have to fill up the captcha or verification letters. Don't be in hurry, fill it up very carefully. Remember if you miss a single word, then you will not get a chance to come back again. You have to try next day.
  •  This is the last option when you have failed after trying many times, hire a broker. You can find them easily. They will charge you some money and you have to provide your login details. They used to have a very high internet to run this business. And without any tension they will arrange an appointment for you.

How to get passport appointment online?

Since 2012, the Indian Ministry of External Affairs (MEA) has changed the process of passport application and reissue. The application for issuance of fresh passport or reissue of expired/expiring passport has been made online. This has been done to streamline the whole process. Also Tata Consultancy Services (TCS) has been roped in to manage the online application system as well as to manage the data entry process. MEA and TCS have launched many passport kiosks also known as Passport Seva Kendras (PSK) where an Indian citizen can visit to submit his or her passport application. This is certainly a good news for Indian Passport applicants as it removes all middlemen and agents in the process. However, in order to visit the PSK, one has to book an appointment online (unless your are filling up a tatkal application in which case you can simply walk into the nearest PSK without appointment). The number of slots at any given PSK are limited and hence they get filled up really quickly as soon as they are open. Here are some of the tips that will help you get your appointment faster.
  1. Make sure you have already created your account on the website http://passportindia.gov.in/
  2. Either fill the application online or download the PDF form to be filled offline. Once the offline form is filled, you need to generate the upload file and upload the same from your account at passportindia website.
  3. Verify all the details entered in the form and submit the form. Once submission is complete, you will now be able to create an appointment.
  4. Click on “View Saves/Submitted Applications” link and the system will list down all the applications that you have created. At most you can create only 3 applications per account.
  5. Select the appropriate application and below the application list, click “Manage Appointment” link. The link will only be enabled for forms that have been submitted. Partially filled forms will not have this link enabled.
  6. On the next screen, the system will ask you to choose PSK nearest to your location and click on “Create Appointment”.
  7. The system will ask you to fill in a CAPTCHA code to verify its a human being and not any automated bot trying to create appointments. The CAPTCHA code is alphanumeric and alphabets are also in capital.
  8. Once you enter the CAPTCHA, click on “Show Available Slots”. Most likely you will see the following message displayed “Currently no appointment slots are available for the selected Passport Seva Kendra (PSK). Please try scheduling an appointment from DD/MM/YYYY, 3:00 PM onwards. Total number of appointments booked today : XXX“. The appointment timings for various passport offices are also published on the passport website.
  9. Note down the date and time carefully. Also sync your computer/watch/mobile (whichever one you refer to) to the website’s clock. Website’s clock is displayed at top left corner of every page.
  10. Visit the website on specified date at least 10 minutes before the scheduled time.
  11. Follow steps 4 to 7 and reach the “Show Available Slots” page. Make sure to keep the CAPTCHA code filled in the form. Do not click on the link to see the slots yet. Wait until the time is exactly 3:00 PM (or whatever time was mentioned in the error message). Hit the “Show Available Slots” within seconds of clock hitting 3PM.
  12. You will now see many slots open for one or more days. Do not think twice and simply choose a slot immediately. It is advisable to choose afternoon slots as many people don’t prefer it or 3PM to 4PM slots.
  13. The system will ask you to enter another CAPTCHA and if the choosen slot is still available, you will receive an appointment confirmation number.
The system may become extremely slow during this period since there is heavy visitor traffic on the website. Make sure to access the website from a broadband or high speed Internet line (if possible, e.g. from office). Do not hit refresh/back buttons on the browser since you will only get one chance before slots get filled. If for some reason, your booking gets stuck on the final page, open another window without disturbing the stuck window and login into your account again and see if you have an appointment ID. Sometimes the system is too slow to respond and may have already booked your slot but unable to show you the appointment confirmation. In such cases opening the account in a new window can help verify if appointment went through.
If you are unsuccessful in your attempt, come back again at the date and time mentioned in the error message.
Do not try to make bookings for multiple accounts as only one account will be logged in from a single browser. If you have multiple bookings to be made, make sure to open them on different browsers (such as Safari, Firefox, Internet Explorer, Chrome etc) or use multiple computers.
Update (June 13, 2013): If media reports in TOI and other leading newspapers are to be believed then Passport authorities are rolling out two important changes in the application process.
  1. Now the system will automatically give an appointment from available slots instead of users logging in at a specific time to book an appointment. Users will be allowed to change their appointment twice in an year.
  2. Payment of Passport Fees will be made online and must be done along with the appointment in order to confirm the booking.
These changes will be rolled out slowly through the country.

Applying Passport Online in India.

How to apply passport online: 

The process for applying new passport online is very simple.
Please follow the below steps to apply passport online. I feel this information may useful to the people who are lack of knowledge on applying passport online.

Steps:

Open internet explorer and type the below website detail and click enter.

As a first time user, everybody who is applying for passport online needs to register their details with the site mentioned above and create a User ID. (Click on “Register” link under the Online Application Filling Section on Home Page)
Once you completed the registration process, login to passport Seva portal with the User ID created above.
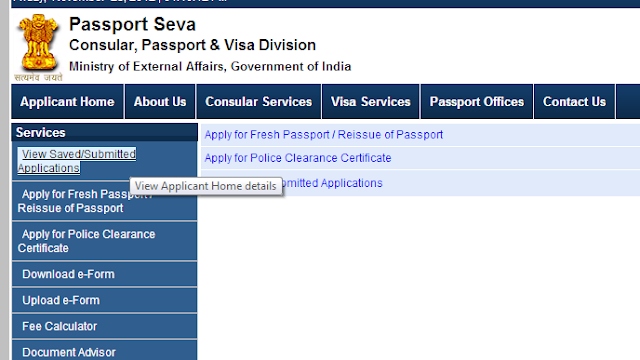
Then, Click Apply for Fresh Passport/Reissue of passport link.
Please keep your id proof documents like certificates, ration card and election ID card to enter your details.
Please enter the details very carefully, if you did any mistake there may be a delay in processing your passport.
Once you have filled the online form, either you can upload all of your supporting documents online or you can show these at time of in person appointment with the Passport Officials.
Please fill the form and submit.
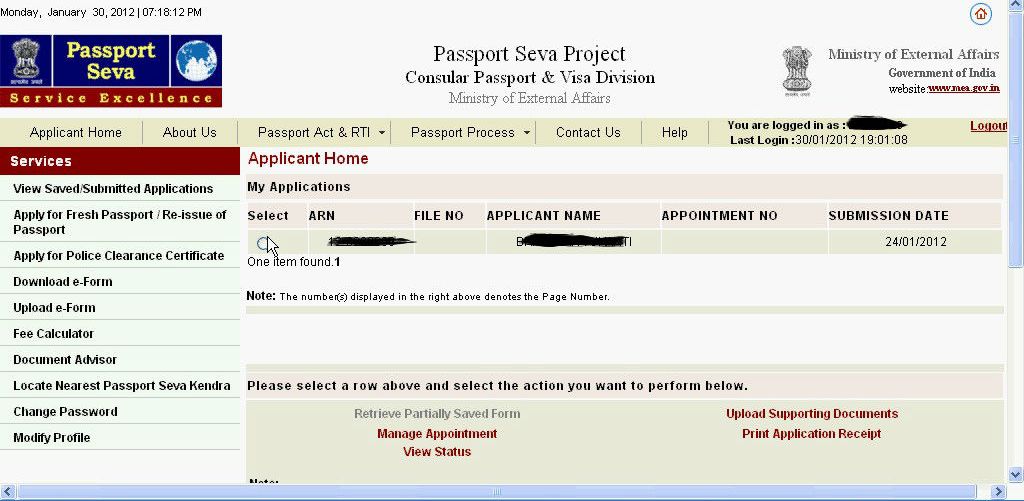
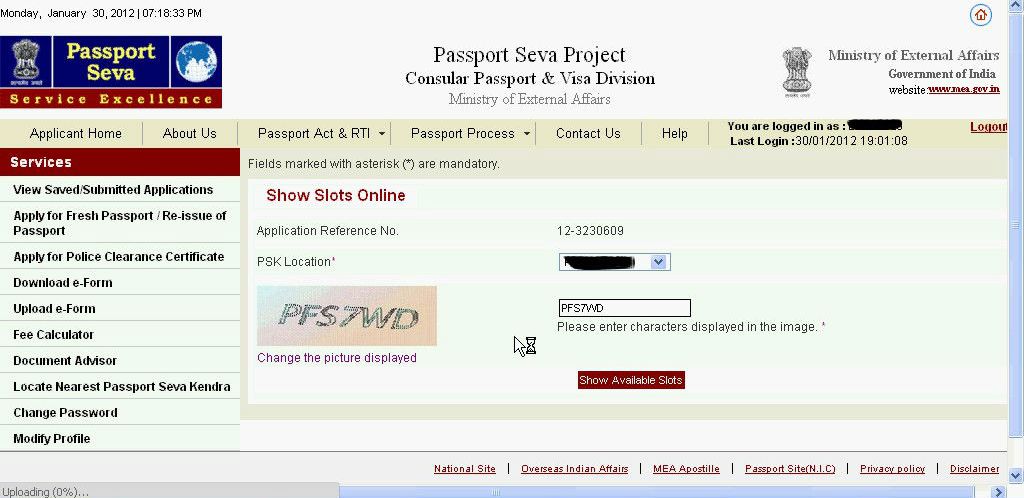
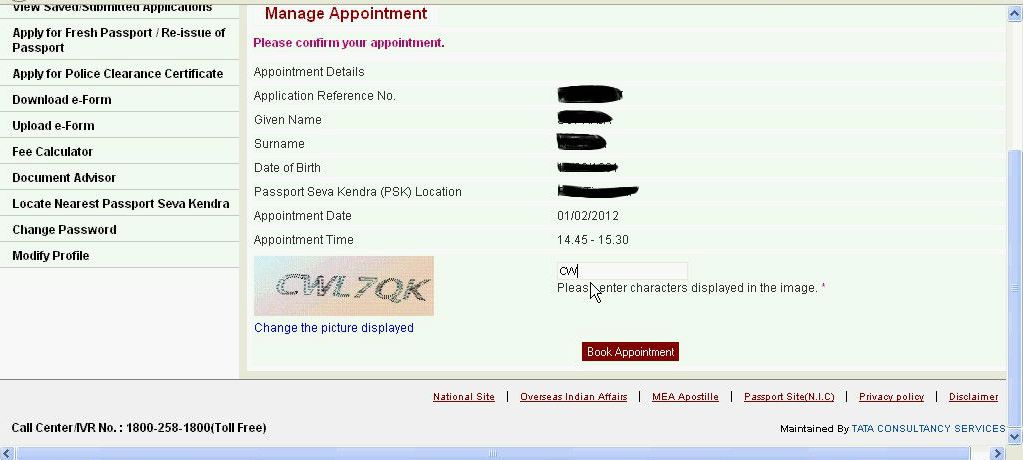
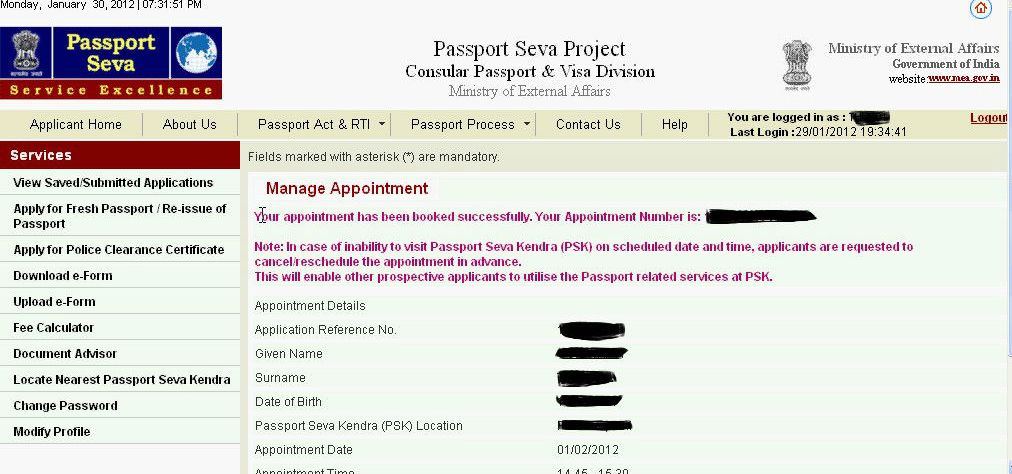
Then, click on “Manage Appointment” link on Application Home Page to schedule an appointment at a passport Seva Kendra (PSK).
Then click the “Print Application Receipt” link to print the application receipt containing Application Reference Number (ARN).

Visit the Passport Seva Kendra (PSK) where appointment has been taken, along with original documents.
Only emergency/medical cases may visit PSK without appointment. Service will be provided at the discretion of PSK in-charge/Passport Officer. 

Minor applicants below 4 years of age need to carry a passport size photograph (with a white background) while visiting Passport Seva Kendra (PSK). Other applicants need not carry any photograph as photograph will be captured at the Passport Seva Kendra (PSK).
Resubmission of application form is required, in case the applicant does not visit the PSK within 90 days from the online form submission.

People who are belong to Krishna, Guntur, khammam and prakasam districts can submit their online form and book the appointment in Vijayawada Passport Seva Kendra.

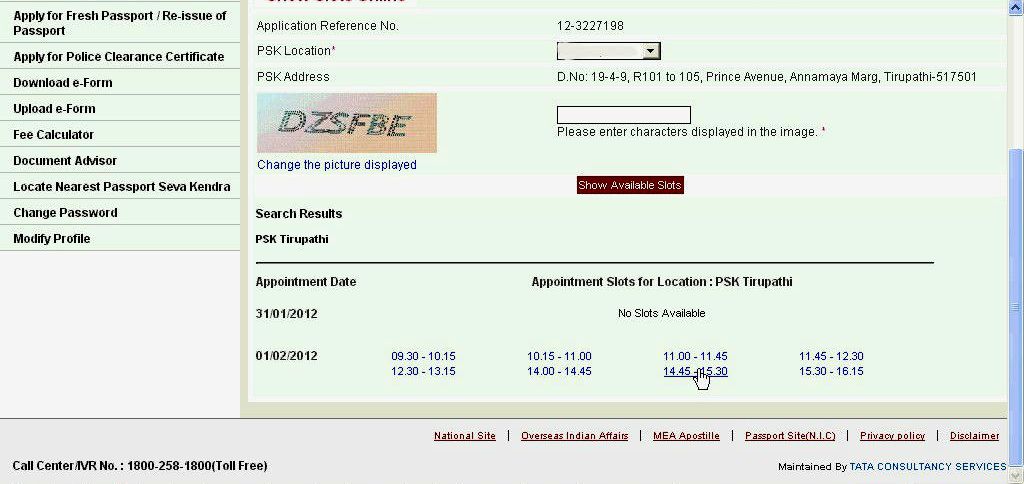
People who are belong to Chittor, Ananthapur and nellore districts can submit their online form and book the appointment in Tirupathi Passport Seva Kendra.

People who are belong to Nijamabad, Adilabad and karimnagar districts can submit their online form and book the appointment in Nijamabad Passport Seva Kendra.

People who are belong to Hyderabad, Medak, Rangareddy, Warangal, Kurnool, Nalgonda and MahaboobNagar districts can submit their online form and book the appointment inHyderabad Passport Seva Kendra.
  
Passport Seva Kendra’s will work from Monday to Friday only.
Please use the phone number 1800-258-1800 to find out the status of your Passport application.
Alternatively you can check the status in online aswell.

Online Payment has been made mandatory for booking appointments at Passport Seva Kendras under some of the Passport Offices.
Click here to view the list of such Passport Seva Kendras/Passport Offices where Online Payment has been made mandatory. For remaining Passport Seva Kendras/Passport Offices, Online Payment will be applicable for scheduling appointment in due course and will be notified accordingly.
Online Payment can be made using any one of the following modes: 
  • Credit/Debit Card (MasterCard & Visa)
  • Internet Banking (State Bank of India (SBI) and Associate Banks Only)
  • SBI Bank Challan
Applicants applying under Tatkaal need to pay only the fee as applicable under Normal Category while making Online Payment. The balance fee as applicable for Tatkaal will be payable in "Cash" at Passport Seva Kendra/Passport Office, once Tatkaal application is accepted by Passport Officials.
To pay using Credit/Debit Card or Internet Banking
Step 1.Click the "Schedule Appointment" link, select the appointment quota (i.e. Tatkaal Quota or Normal Quota (required only for Tatkaal ARN cases)), select the desired Passport Seva Kendra, and click the Next>> button.
Step 2.Click the Pay and Book Appointment button to redirect to State Bank of India's Multi Option Payment System (MOPS).
Step 3.Select the Mode of Payment (NET BANKING or CARD PAYMENTS), follow the instructions and make payment. Please do not click the Back button or refresh the page, as this may lead to failure of transaction.
Step 4.Once the payment is successful, an appointment will be booked automatically for the selected Passport Seva Kendra and the "Appointment Confirmation" screen of PSP Portal will be displayed.
Step 5.Take a printout of the Application (ARN) Receipt, and carry it along while visiting the Passport Seva Kendra on the given appointment date/time.
To pay using a Challan
Step 1.Generate and print SBI Bank Challan through the "Pay using Challan" link.
Step 2.Submit the Challan along with indicated application fee at the nearest  SBI Branch after at least three hours of Challan generation.
Step 3.Payment will be reflected after at least two working days of depositing the fee in the SBI branch. Click the "Track Payment Status" link to track Payment Status.
Step 4.If Payment Status is displayed as Success, click the "Schedule Appointment" link, to schedule an appointment.
Step 5.Select the Appointment Quota (i.e. Tatkaal Quota or Normal Quota (required only for Tatkaal ARN cases)), select the desired Passport Seva Kendra, and click theBook Appointment button. An appointment (if available) will be booked automatically for the selected Passport Seva Kendra.
Step 6.Take a printout of the Application (ARN) Receipt, and carry it along while visiting the Passport Seva Kendra on the given appointment date/time.
Online Payment will remain valid for one year from the first appointment date. The paid fee will be forfeited if applicants do not submit application at PSK within this period.
Chargeback/Refunds:-

No claim for refund, return or exchange of fee will be entertained for passport related services. In case of multiple payments for the same ARN, for Passport related services including miscellaneous services, the claims for refund will be dealt with as per extant policy governing them.
  • Reschedule/Cancel an Appointment
    • Once an appointment at Passport Seva Kendra is confirmed, it can be rescheduled/ canceled only twice within a year of the first appointment date.
Hope you may helpfull with this information.

How to apply for an Indian Passport online

The procedure below is for online application of Indian Passport through the website - www.passportindia.gov.in
Well first of all the facts - 
Wife's passport applied on - 18.dec.2012 and received passport on 3.jan.2013
Son's passport applied on - 1.jan.2013 and received on 6.jan.2013
And the above two results you see are for normal passports, not even tatkal! Fees I spent was only 1500 + 1000 = Rs.2500 for both of them. No agent, no hassles. Pure and direct. The PSK at Sai Arcade, marathalli, Bangalore was comfortably air conditioned, nicely managed with food outlets, clean wash rooms and nice and big display screens displaying your token number that you are given from the counter at PSK. What more can you ask for?  It is systematic, fast and transparent. This seems revolutionary to me when compared to the way passports were availed previously. The process was manual, painstaking and time consuming. Just booking the appointment slot remains the tricky part now though. Slots get filled up fast... within a few seconds!!! I have noted down below (particularly in step 8) how to book it in a way that will maximize your chance of getting a slot. Read slowly, carefully!
1. Go to www.passportindia.gov.in and then register for a username and password.
2. login with username and password. download e-form and keep it in one empty folder... and then open the pdf form to fill up the details. Fill up important details like birth place, nearest police thana etc correctly and then save the pdf form. it will generate xml files as well.
3. upload e-form. An ARN number will be given which you can see right now when you click on view submitted forms. Note here, as far as my own experience is concerned. There is no need to upload any documents. Documents you have to take with you to PSK - original as well as self - attested copies. From step 4 to step 8 I am explaining how to book for an appointment slot and this should be read carefully.
4. Go to the link - View saved/submitted applications. Select your application and then click manage appointment.
5. After that select a PSK that is near to your house, fill in the characters asked for (i.e. the captcha) and then click submit.
6. Then select 'book slot'
7. A message might be displayed like this 'all slots are booked. slots will open from so and so date at 6 pm (this time may vary). try then.
8. Now this is the important step. On the date mentioned on step 7, exactly at the time mentioned, say at 6 pm, the slots will all vanish very quickly. just before 3 minutes to 6'O clock, log in with your username and password and then go to view saved/submitted applications and then select your application and click on manage appointment. On the next page select the PSK nearest to your location (and where you intend to go for appointment) and then give the correct captcha (be careful with caps lock here) and then click submit. Now you should sit on this next page where book slots is shown and keep an eye sharp at the clock. just when it is 6 pm (or whatever time it is mentioned in step 7) hit the link 'book slots'. The slots will come next with blue links...please dont waste time here and immediately book one slot whatever you see... don't waste even a millisecond here!!!! If your luck is really bad then here again you will see an error message like this - your slots have been taken away by someone else.
This is the time when there will be a spike of huge traffic and there is no guarantee that you will get a slot. But with little bit of luck you will have your slot. If one day you dont succeed then don't feel helpless.... keep trying. I tried for 8 - 9 days before I successfully got an appointment for my son. I was determined not to go to an agent. However I had successfully got an appointment slot for my wife... in the 1st attempt itself! Read step 8 once more and be very prompt in your booking of appointment.Good luck! Note that only after successful booking of appointment slot can you see the file number against your entry. Before this only arn number used to be visible. Also note that if your son is a minor, then booking of appointment is no more necessary - this I heard though please verify if it's true.
9. After successful booking of slot you have to take the necessary documents - xerox copies and in original with you to the PSK. Also printout of the receipt should be taken and carried to the PSK. Necessary documents can be found from the website itself. For my wife's passport I took her 1 year bank statement with the required address (in original and xerox-self attested) for address proof and her birth certificate (in original and xerox-self attested) for age proof. For my 1 and half year son I had carried birth certificate ( in original and xerox) and my wife's same bank statements and annexure H. The bank-statements in original have to be submitted to the PSKs and the xerox copies can be kept for police verification later. Come home and wait for call from the Police.
10. A call will come on your mobile from the Police Station and they will tell you how to proceed for the police verification. Follow what they say.How to apply for an Indian Passport online
11. Do nothing. Just wait. An sms will come that will read like this: Dear so and so, your passport <passport number> has been despatched on 2013-01-02 thourgh speed post. Speed post tracking no. is so and so.Next day your passport will come on speed post.
Note:
a. The passport will come to your door from India Post - speed post. On a side not, let me reiterate that our Govt. Postal service (India Post) for delivering speed posts is very good and you can know about that from one of my earlier blog posts... 
b. Every time you can check on the status of your passport from the website - like when it is sent to police, when it is sent from police station and when it gets printed and when it is dispatched and so on. This facility is awesome. You get to know when and where a delay gets caused at any time you want.
c. There is a phone call facility (1800-258-1800) for you to get answer of whatever question you want. Just talk to them.
Disclaimer:
Please note that the above procedure for online booking has been noted down from my own personal experience and from my memory. It might not match word by word - with whatever the website messages say. So personal discretion is necessary to follow the steps. My only purpose for noting down all the steps is to help the readers book passport online in a hassle free way. Do read steps laid down at passportindia.gov.in and reach out to their call center for any doubt you may have.

How To Apply Passport Online And Manage Passport Appointment?

Passport Application process has now become online with very few passport offices accepting hard copy of applications. The official website for passport application of the Government of India & also the Passport Seva Kendras (PSK) are now maintained by Tata Consultancy Services. This change has come as a boon to the people who are tech savvy & technology friendly but as a bane to those people who are too intellectually challenged to apply passport online & manage passport appointment. So, here are some guidelines which can make your passport application process easy & simple.

How to Apply for Passport Online & Manage Appointment?

Go to the official website of the Ministry of External Affairs, Government of India for Passport Seva :
http://passportindia.gov.in

1. Registration:

Registering yourself with a valid email ID is compulsory before proceeding with Application filling process.

i) Click on “Register” hyperlink as a New User under “Online Application Filing” headline.
ii) Then fill up your personal details as shown in the picture below.
iii) After registering yourself successfully, a “Thank You” message appears for registering on the Passport Seva Portal & a link is sent to your email id.
iv) To activate your account, please click the link that is sent to your email id. The link will expire after 7 Days.
v) Your account will be activated & this will complete your registration process. 


2. Passport Login:


i) Now login as an existing user by clicking the “Login” hyperlink.
ii) Give your Password.
iii) See & Type the Captcha displayed on your screen in Capital letters & click the Login button.
iv) Then click on “Apply for Fresh Passport / Reissue of Passport”.

3. Passport Application:

There are 2 alternatives :
i) You can download the soft copy of the form, fill it offline, up-load the filled form.
ii) You can also fill the application form online.
Filling up the Application form is easy. Just fill up the form with the appropriate details. If you are filling up the form online, just click “Next” after finishing every page. Click on “Save my details” if you want to leave your application unfinished & continue filling it the next day. You can navigate between the Previous/Next page & edit your details until you click on “Submit” in the last page. Once you submit your application, you won’t be allowed to change anything.

4. Manage Appointment for Passport:

Scheduling an passpost appointment is the most difficult part of this process. It requires a speedy internet connection, speedy execution & sound knowledge.
Some Important Information regarding Passport Appointment Scheduling :
i) The appointment window opens & hardly lasts for 2-3minutes.
ii) You are allowed to schedule an appointment 5 days a week (Sunday to Thursday). This varies from time to time.
iii) The appointment page will show you a slot of 15 days with different available time slots. This also varies from time to time & from one PSK to another. If you have opted for “TATKAAL” passport, then the page will show you time slots of a single day.
iv) If you lose a chance in a day, you can’t have a second try on the same day. In that case you have to wait for 24 hours & try your luck next day.
v) Back buttons are disabled while navigating between the appointment pages.
vi) Reload/Refresh buttons are also of no use in that page.
vii) Multiple Logins are disabled. So, don’t try this as in this case you will be logged out automatically & will be able to try again the next day.
Tips & Procedure:
i) Adjust your computer’s clock with the clock on the website which is always displayed on top of web page whenever you take any action & follow the time.
ii) Login before 5 minutes from the time scheduled for managing the appointment.
iii) Select the file & click on “Manage Appointment”, then choose the type of Appointment Quota (either Normal or Tatkaal) & click on “Create Appointment”. Option to choose the Appointment quota comes only for those people who have opted for “Tatkaal” passport while filling up their application.
iv) Then choose your PSK & enter the captcha fast & just at the stroke of the exact time, click on “Show Available Slots”. (Remember to keep CAPSLOCK “ON”) while entering the captcha everytime.
v) Server becomes a bit slow around that time due to huge traffic, so have lots of patience & wait for the page to load even if it takes some time.
vi) When the next page opens, don’t think too much. Just click on any available date/time slot.
vii) You will be asked to again enter a captcha & confirm your slot in the next page. Either you will be successful or will fail to schedule an appointment on that day.
viii) Sometimes you may be logged out automatically after this. In that case when you log in again see if there is an Appointment No. beside the Applicant Name in the row corresponding to the ARN. If yes, then you have got the appointment. Then select the file & select “Print Application receipt” button to print the Appointment Sheet.
ix)  The Appointment Sheet will have a BATCH NO. & SEQUENCE NO. with the date/time & other details mentioned in it. Take a print out of the page because this is your ticket to the PSK where you will be allowed entry on showing this page.
Note : Even if someone is a mili-second faster than you & clicks on the same day/time slot that you selected, then you will not get the appointment & have to try again the next day.
My Advice:
i) Try to click on the day/time slot which is at an uncommon place on the screen & any person who just views the page have a less probability to click on the same slot.
ii) Another thing you can try out is that, you can directly scroll down & target the last day given in the slot & select any time in the middle of that day quickly. Don’t think too much when you are inside this page & enter the captcha fast.
However, unfortunately none of these guarantee your successful scheduling of appointment. These are just measures which may increase your probability of successfully managing the appointment.
This completes your online Passport Application process. Now, just visit your concerned PSK at the date & time on which you managed the appointment.

5. View Passport Application Status Online:

To get the current status of your passport application :
i) Click on “Track Application Status” on the left side of the website under “Passport Services” headline.
ii) You will get a File number, after successful completion of procedures at the PSK. Enter that file number along with your Date of Birth & click on “Track” button.

6. Police Verification:

Be alert with the phone number that you have mentioned in your passport application form as you will get a call from the POLICE where he will mention the documents which you are required to provide him & will also tell you the day/time of his visit when you are required to stay home.

7. Passport Dispatch:

As soon as your passport is ready, you will get a Passport Dispatch Intimation SMS in your mobile & will also get a mail in your email ID mentioning the date of dispatch & your passport number. So, giving a valid email ID & phone number is very important.
Thus, except the Appointment management process, all other steps are very easy & simple & require minimal/basic computer knowledge. Appointment management needs a bit of luck with both internet & your own speed. But with some patience it is easily achievable. You will be able to develop your own intuition if (in case) you fail once or twice to schedule appointment.
In case, you have any more queries/doubts feel free to write to us & it will be our pleasure to help you.